How to Install Radiant Floor Heating in Concrete
At least not in my opinion. A radiant heated concrete slab has far too much definition to be branded as "tubing in concrete." What it really is is a robust, highly efficient heating system that should last for the lifetime of the building that it serves. How many times have you walked into a shop or other building that has a "long since discarded" radiant slab application? I have seen quite a few. Actually, if the amount that I have seen is any indicator of the rest of the country, failed applications must be more common than we realize.
The failures I see invariably are the result of incorrect installation. Typically, a large crack in the concrete slab has compromised the tubing, resulting in multiple leaks. Even more common than that, is the lack of proper insulation underneath the slab. People just can't afford to pay the operating cost for a system that doesn't have the proper insulation under the slab.
Here's another failure that I have seen, and it makes me chuckle. A frugal business owner attempted to install his own system; he had just enough knowledge to get himself into a peck of trouble. After he had the tubing all laid out, he started thinking, "That tubing is filled with air. It's going to float right up to the top of the concrete. I'm going to fill it with water so it stays at the bottom where it belongs."
Since he was the boss and there was no one there to offer a professional opinion, that's exactly what happened.
Now this in and of itself, may not have been so bad. Unnecessary? Yes, but not the end of the world. Here's what happened though: cold weather arrived, and the building was not completed. Neither was the radiant slab hooked up to a heat source. The water in the tubing froze and split open every tube under the slab. All that "frugal" he had invested in his radiant slab was out the window, and he had to resort to an entirely different type of heating system that offers far less comfort to an equipment shop with high ceilings.
How many times have you heard this from a builder or homeowner: "We have installed the tubing, we just need you to hook it up"?
We've all heard it. Nothing makes me lose interest in a job faster than that (all too familiar) line. I take the time to find out the installation details, but, more times than not, I walk away. I don't want my name on an ill-performing, glutinous system. It is so much better when, as a radiant contractor, you can get involved at the onset of building planning. Working with the architect, builder and concrete contractor while still in the planning phase is a key ingredient to getting a well-installed radiant application that is designed to last a lifetime and not be intrusive to the building's interior space. It gives you the opportunity to provide space for the mechanical equipment and install the manifolds in a spot where they won't suffer damage or get buried with junk.
The last radiant project I did was 8,624 square feet. This was for a farm shop that will be used for heavy equipment repairs. It seems equipment shop owners are trending more and more towards radiant slab heating. When they bring in snowy equipment during the winter months, the snow melts quickly, and the metal of the machinery warms up, making the repairs a more pleasant experience. The floor also quickly dries up any snowmelt, leaving a safer working environment. Another big thing is comfort recovery after opening and closing large overhead doors. Far less heat is lost while a big overhead door is open, if you have a heated slab. Also, minutes after the door closes, the room is comfortable again.
There are many advantages to a radiant slab over other systems, but once again, as radiant contractors, it is our job to ensure these systems bring the occupants comfort and last the lifetime of the building, as they cannot readily be replaced.
Loop layout
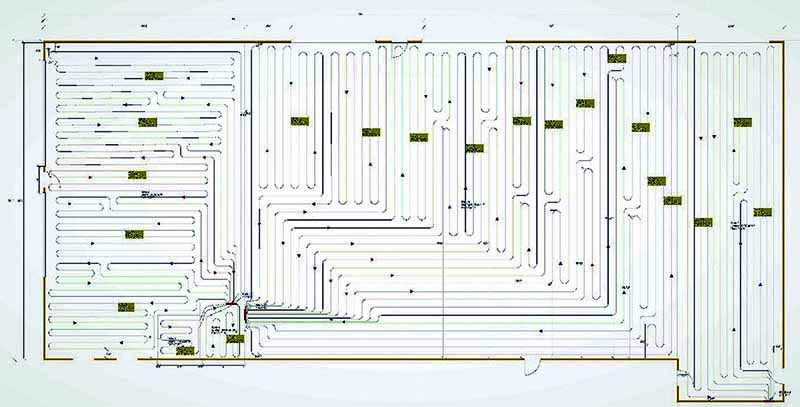
I like starting every job with a heat load calculation followed by a loop layout.
I can't stress enough how valuable I have found an accurate loop layout to be. I realize that you can multiply the building's square footage by the amount of linear tube per square foot and then divide that number by your proposed loop length, but that only gets you close and does not account for loop leaders and closer tubing spacing leading to a manifold. It also may not get your wall offset spacing correct. Long story short, you may end up with not enough tubing for the job or up to 15 percent waste from your tubing coils.
With loop design software, you can play around with loop lengths and spacing to accurately hit your desired mark. It also gives you an accurate map to use while you are installing the pipe.
There are a few targets to hit in a loop design.
In order to minimize the amount of tubing required, you want the maximum tube spacing that will maintain comfort while keeping your water temperature low, preferably not going above 115 F to 120 F. These water temps are low enough to allow refrigerant based heat pump systems to be used in the future, even if you are installing a boiler at this point. In this job, the main area is spaced at 18 inches. The 2 small areas are spaced at 15 inches and the bathrooms are spaced at 12 inches. Generally speaking, that spacing is too wide for a home, as thermal striping will occur. But in a shop application like this one, the occupants will always be wearing heavy soled work boots and will never feel any difference in floor temperature.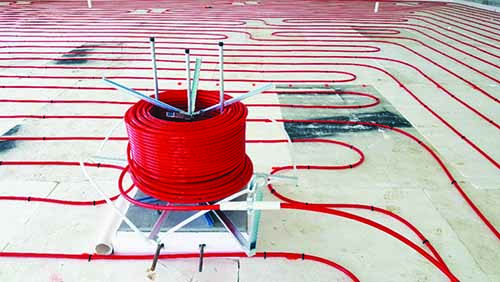
The other thing that I try to target while doing loop design, is to match the system flow requirements and head loss to the pump's performance curve. You want to target the center of a pump's curve, as this will produce the most efficient operating point and the longest pump lifespan. This requires a balancing act between loop length, tube size and tube spacing. You also don't want to forget what tubing coil sizes are commercially available and target your loop length to get as much usable material as possible out of each coil.
At the overhead doors, I keep the tubing back from the edge about two feet. I am not aware of any method of installing a thermal break in the slab that does not compromise the structural integrity of concrete between the heated slab and the concrete apron outdoors. By keeping the tubing back two feet, most of the heat should dissipate from the slab before it reaches the door's edge.
Installing the tubing
 With all the design homework done, the installation was a snap. The customer supplied a laborer to help lay out the tubing. We began by marking off the tube spacing on the foam with orange marker paint. The customer had purchased his own foam insulation from a building salvage company. I like the idea of reusing building products. He saved a heap of money on it, and it will serve its purpose perfectly. The only thing I didn't like is that it had no markings on it to use as a tubing guide.
After the insulation was all marked off, I asked my helper, "Would you rather pull the tubing off the uncoiler and hold it in place, or would you rather staple it to the foam?"
Before he had a chance to say anything, I followed up with, "excellent," grabbed the staple gun and waited for him to do his job.
His reply was a shifty grin, and then after spitting another stream of tobacco juice in his Dr. Pepper spittoon, he grabbed the end of tubing protruding fr the uncoiler, and we began.
After the tubing was all laid out and stapled down, it was time to make preparations for the concrete joints. I normally use 3/8-inch foam pipe insulation to protect the tubing where it passes through a concrete joint. I cut them in six-inch pieces and clip them over the tube in the center of the joint. This gives the tubing some flexibility to move and stretch. It also prevents the concrete from shearing the tube if the slabs have vertical movement at the joint.
I asked my helper if he would be interested in installing this pipe insulation.
He happily agreed. Doing this job, it would be much easier to keep his Dr. Pepper bottle close by. This seemed to please him!
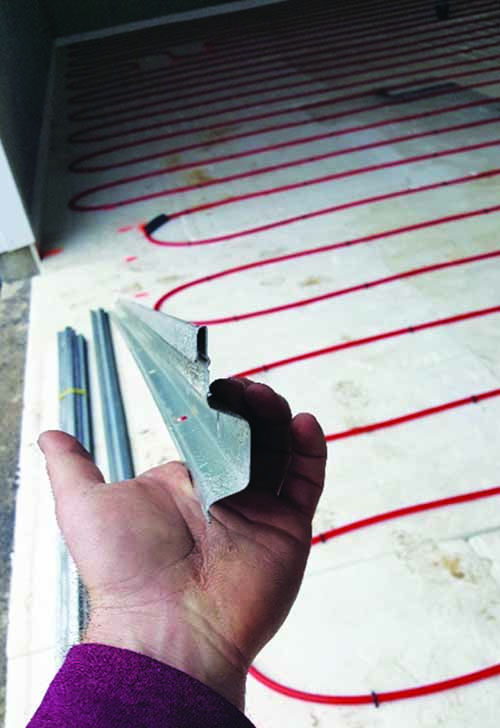
Another note on the concrete expansion joints: Would you trust someone to saw cut the joints after the concrete is poured?
Me neither! They are almost guaranteed to hit a tube somewhere; that's one of the rules of life. And if they keep the saw blade high enough so they won't hit any tubes, the concrete will crack in some random place where you have no tubing sleeves in place — another rule of life (See photo above for one solution).
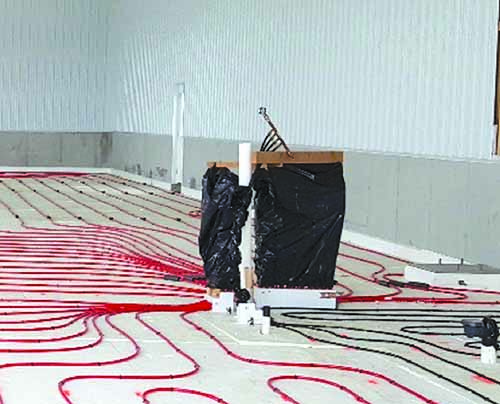 Setting the manifolds
While my helper installed the tubing sleeves and kept his Dr. Pepper bottle entertained, I began setting the manifolds. In this case the manifolds could not be attached to a wall, so I had to build a support structure to hold them in place. It takes some careful measurements, but it is well worth it to set them in precisely the right location so you don't have to reset the after the walls are built. The PEX-Pal blocks make this task much easier, not to mention a neat-looking job after the project is finished.
Another important and often overlooked detail: Always have someone standing by while the concrete is being poured to repair any tubing that might get damaged during the pour.
So, yes, it's not just tubing in concrete!
How to Install Radiant Floor Heating in Concrete
Source: https://www.phcppros.com/articles/5587-its-not-just-tubing-in-concrete