How to Install an Inground Pool Liner Yourself
 Replace your own inground pool liner, and save thousands of dollars over local installers! Installing your own inground pool liner is easy, when you take it step by step.
I will assume you have already measured your in-ground pool with our liner measuring forms, following the steps in a previous blog post written by Jackie on how to measure for an inground vinyl liner. Or if not, here's some help:
Measuring your Pool
Accurate measurements are key to getting a liner that fits like a glove. Most inground vinyl pools have a geometric floor shape, with precise angles. The corners of the pool, at the top of the wall, have a specific radius measurement. And, most pools have square measures – with both ends and both sides being the exact same length.
However! Many pools are built just slightly askew, and end-up a few inches off from spec.To be sure that you order a correctly fitting liner, measure your pool correctly, and double check your measurements.
You may have measures available from a previous liner order, or you can probably dig up the original spec sheet which shows the length, width, depth and radius of the corners. However! Most pools will vary from the original specs, and can slightly shift over a period of many years, so it's always recommended to remeasure the pool, completely.
 Measurement Equipment: You will need a 50 ft measuring tape, rigid or flexible, and a 25 ft rigid tape. A pool pole is used as a vertical rod to measure distances across the floor. A clip board and pencil to write down the pool measurements. Two people are needed to measure the pool, and you don't need to drain the pool, but the water should be clean, so you can see the bottom clearly.
Measurement Form: You will need a measurement form for an inground pool liner. These are fairly standard, but it's best to use the form provided by the dealer that you plan to order the liner from.
Follow the steps of the measurement form, and be sure to fill out all boxes and answer all questions. Don't forget your name and contact information!

To measure depth of shallow end (D), just use a rigid measuring tape, being careful to measure from the bead or track, to the flat floor. For the deep end depth (C), run a tight string (or flexible measuring tape) across the deep end, on the edge of the hopper and use a pool pole, or other long pole, placed into the corner of the hopper. Measure the pole at the point where it intersects the string, and then subtract the distance from the deck to the liner track, or bead. You can also use two pool poles at 90 deg angles to each other, to help hold the vertical pole in position, on larger pools. Holding the pole with a carpenter's level as shown here, is not usually attainable, as (V) is normally at least 4 ft. wide.
To measure length of the pool (E, F, G, H), with water still in the pool, tightly secure a flexible measuring tape (the reel-up type), the length of the pool, then use vertical pool poles to measure the length of each section. Your helper should eyeball the pole to make sure it looks vertical, and is not tilted. When measuring the slope from shallow to deep (F), do not measure down the slope, but measure horizontally to a pole held vertically. You can also use a plumb bob on a horizontal pole, and measure to the vertical string. Once you know 3 of the 4 measures, you can extrapolate the fourth, as long as (E+F+G+H = A).
To measure width of the pool (I, J, K), use a pool pole held vertically in the corner of the hopper, and measure horizontally from the liner track to the pole. Do not measure down the side-slope, the measuring tape should be horizontal. Switch sides and measure the width of the opposite side wall. You can then extrapolate the width of the hopper, as long as (I+J+K = B). Typically, the K and I measures are the same, but don't assume, they can be different.
Measuring Pitfalls to Avoid:
- When measuring F, H, I and K – don't measure down the slope, measure horizontally to a vertical pole.
- When done measuring, check that A and B measurements add up to the total of all length and width measures.
- Check A and B measures at top of the wall and bottom of the wall, to be sure walls aren't leaning.
- Measure depth from the flat floor, (not the top of any coved sand) – to the bottom of the liner bead track at top of wall.
- Keep your vertical measuring pole straight, or use a plumb bob on a horizontal pole.
None of the work below should be done before you have the liner and materials ready.
Choosing a Replacement Liner
One of the fun parts of putting in a new pool liner is choosing a new pattern or style. Darker colors will absorb slightly more solar energy. Tan and Grey tones have become popular lately, to blend with neutral backyard colors. Most patterns have a mottled pattern, to help hide dirt and mask wrinkles or imperfections. If you can afford it, I would always recommend choosing a thicker liner – 28 or 30 mil, rather than a standard 20 mil pool liner.
Warranty is another way that liner manufacturers differentiate their products, but keep in mind that a true warranty claim, for defects in materials or manufacture, is rare. 99% of liner failures are caused by pool chemistry or Acts of God. Also, most warranties are pro-rated, so a 25 year warranty may have little value over time. Liner warranties typically cover seam or bead separation, but won't cover punctures, or sun or chemical deterioration. Specifically, inground liner warranties only cover you for "defects in materials or workmanship".
When you order a pool liner, you may also consider ordering wall foam and adhesive. If your steel walls are rusty, or to just add a soft feel to your walls, 1/8″ thick wall foam is added to the walls before you install the new liner. There are several great liner manufacturers in the states, and lots of good vinyl comes from Canada – some well known liner companies are Pen-Fab, McEwen, Tara, GLI and Swimline.
Choose a pattern and style that you like, you're going to be looking at it for many years!
Supplies needed to replace your inground vinyl liner:
- Custom vinyl inground pool liner
- Wall Foam and spray adhesive if desired or needed
- Floor repair sand or vermiculite
- 2 – 1″x12″ boards to stand on
- Duct tape
- New faceplates and gaskets for skimmer, returns, main drain, light
- 2-4 people for step #3
Tools needed for liner replacement:
- Razor Knife and Putty Knife
- Flat head Screwdrivers
- Liner Vac or HD Shop Vac
- Extension cord
- Push Broom
- Cordless Drill with #3 Phillips Tip
Getting ready to replace your inground vinyl liner:
When you get ready to begin, the first steps are to safely drain the pool to the storm drain or far from the pool, where it won't flow back under the pool. Sanitizer level should be near zero, and the pH should be between 6 – 8, to protect your local watershed, but it need not be clean and clear.
Check the Weather
 The weather does play an important part on the liner installation also. You want the temp to be at least in the 60s and a sunny day makes for an easier liner install. Check the weather, and avoid overcast or rainy days. On the flip side, being too hot can also be a problem. When the temp is in the high 90s and the sun is beating down on the liner it tends to stretch out and expand the liner, making it harder to get a wrinkle free liner installation.
Assemble the Team
 A vinyl liner installation is easily done with two people, having a third or fourth person on the job is helpful, especially when you are pulling the liner across the pool, and locking the bead into the track. Planning your installation during spring break, or stretched out over several weekends, may help in obtaining helpers. Pay a decent wage, and you should have no trouble putting a small team together.
DRAIN THE POOL
If the pool has severe algae and large volumes of leaves and other debris, consider renting a small 'Trash Pump'. Gas powered trash pumps can pass solids up to 1″ in size. To get every last drop of water, and drain the pool completely, remove the main drain cover and use a sponge and bucket. You can also use a cover pump, or a wet/dry vac or even old towels, to get up the last few gallons. Set aside the drain cover and screws for now.
Wait to drain the pool until you have everything ready to go, and a good weather forecast. Leaving your pool empty for very long could damage the pool walls or floor, if freak weather and floods move in before you have a chance to refill the pool.
 A submersible pump can be set in the pool to drain it slowly, in 10-30 hours, depending on the pump size. Some inground pools can drain most of the water out of the pool from the main drains, using the filter pump. If you have a multiport valve, set it to waste, and run out a long discharge hose, away from the pool (and your neighbors!). Close the skimmer valve tightly and keep the pump running (and draining) until the main drains begin to suck air. The remaining water can be removed with a pool cover pump or small submersible pump.
You will need to drain ALL of the water out of the pool. Get the last bit with a mop and bucket, large sponge, a shop vac or your cover pump. Five or ten gallons spilled won't hurt the floor of the pool, but don't remove the floor of the liner with inches of water still left in the hopper.
Pool Draining Pitfalls to Avoid:
- Discharge the pool water too close to the pool, and it can weep into the pool, or put pressure on weak walls.
- Water should be balanced and low in sanitizer and algaecides, to protect the watershed. Green water is OK!
- 20,000+ gallons is a lot of water, be sure that you are not eroding or over saturating a hillside.
- Some areas have pool drainage and discharge restrictions and regulations. Check your local govt. website.
- Don't flood a downhill neighbor's garden, garage or basement!
- Check the weather, flood waters and high water tables can cause problems for an empty pool.
CUT OUT THE OLD LINER:
 Cut the liner with a razor knife at the base of the wall – all the way around the pool, and under the pool step. Then cut vertically from the floor, up thru the top bead in several spots around the pool. Carefully pull the liner from the track by lifting up and outwards, the plastic track may be brittle and can crack if stressed. Roll-up the wall sections, and remove from the pool. Leave the floor section of vinyl liner in place for now, keeping it in the pool until you are ready to work on the floor.
 Carefully remove, with a large #3 Philips screwdriver, the faceplates for the skimmer(s), wall return(s), main drains, pool lights, and pool step sections. You can use a cordless drill as well, but be sure to use a large #3 Phillips bit.
Safely store your screws, so not even one gets lost, we usually use Zip bags for the screws. The screws will not need replacement if they are not damaged. It is however recommended to replace the faceplates and gaskets, except for the step gasket, which is a very thick and durable rubber seal.
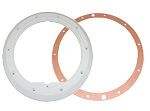
Order the correct gaskets (they differ by Manuf.), for your skimmer, main drain, pool light and wall returns . There are two gaskets used, one behind the liner, and one on top of the liner.
New faceplates for the skimmer, drain and returns are also recommended, as older plastic faceplates will warp and crack, which makes a poor seal that can seep and weep water.
Step 1: Wall Prep
Now that you can see the wall, inspect it closely for corrosion, rust or any odd stains. If there is anything that looks like rust or severe mold or mildew, you should scrape and paint these areas then follow-up by adding Wall Foam – to keep such things from staining or damaging your new pool liner.
 If you have holes through your wall, that's more than Wall Foam will handle, you will need to patch with sheet metal or heavy plastic, then follow-up with Wall Foam. Wall foam can also be added just to improve the feel of the wall, which feels rather hard and cold without it. Wall foam is easily installed using an adhesive spray, using 2 or 3 cans per pool.
While inspecting your walls, you may decide to duct tape the wall joints, where the panels come together. This helps hide the seams, as seen through the liner. Any separation or suspected leakage can be filled in with silicone or other elastomeric sealant.
Inspect the liner track at the top of the wall, and clean it out with a hand brush or pool brush. If you have any areas that are cracked or broken, Super Glue makes a quick repair. For missing sections, ask your dealer for a section of liner track. Close up pictures are helpful to find the correct type of liner track, as there are several types.
Inspect the surfaces of the wall where the faceplates attach – skimmer, returns, light and steps. If you see rust, this indicates that it has been leaking. Clean it up as well as you can, using rough sandpaper, steel brush or wire wheel. Paint it with a rust tolerant paint like Rust-O-leum or Krylon. After cleaning the surfaces, use small strips of duct tape to secure the skimmer, pool light and main drain gasket, the one that goes under the liner (there's a second gasket used on top of the liner).
 If you have an inground pool light, with a cord that runs through the wall, you will have to remove the light completely, to install a new liner. First, shut off power and open up the junction box. The J-box is usually off the deck, directly behind the light, or on older pools under the diving board. After removing the wire nuts, and loosening the clamps, duct tape a long piece of string to the wires. Pull the wire cord out into the pool, pulling until the string comes into the light niche. Cut the string with your razor knife and duct tape it to the inside of the niche.
Be sure to order new pool light gaskets, and possibly a new light ring as well, if it looks aged, yellowed or is cracked or warped. The SS screws can be reused as long as the Phillips heads are not worn smooth, aka stripped.
Step 2: Floor Prep
When you have completed the wall prep and you have checked the weather to be certain that you can continue from this point to completion, we can begin to remove the liner from the pool floor. Cut it with your razor knife into long strips, roll-up and remove in sections.
- Concrete or Vermiculite Floors:
 Sweep the floor clean with a broom and/or leaf blower. Use a dust pan, or wet/dry vac to remove all of the little pebbles, grit and granules. Fill in any holes with a Concrete/Sand mix, a Vermiculite/Concrete mix or just plain Vermiculite mixed with water. Clean the pool deck areas around the pool, and/or wet them down, to prevent debris from blowing into the pool.
 - Sand Bottom Pools:
Sand floors require much more work to prep, and you have to work and walk very carefully around the pool. You'll need large plaster trowels; the stainless steel, rounded end type. Remove any spoiled or odd-colored sand and replace with new. Remove any small pebbles or windblown debris. Low areas can be filled in new sand, but be careful not to add too much sand, or you will raise the floor higher, this could make the new pool liner fit poorly.Trowel the floor smooth, starting in the deep end and working your way out the shallow end.
 Use the 1″x12″ boards to move around, these dig into the sand less than your shoes. Large 2×4's can be used to roughly screed flat areas, finishing with the trowel. Lower raised areas by pounding them down or scraping off high spots, and fill in the low spots. It needn't be absolutely perfect, as most patterned liners will hide minor floor imperfections, but try to get it as level and even as you can.
Pay particular attention to where the wall meets the floor. If this area is wavy, and not fairly level, it can look odd. Around the deep end of the pool, you can choose to trowel in place, a safety ledge of 4-6″ where the wall meets the floor.
![]() As you go, Measure carefully from the track to the floor, all around the pool, to be sure that the pool depth will match the ordered liner wall height, consistently around the pool. Wrinkles or uneven stretching will result if the floor height (or depth) is not equal all around the edges and across the floor.
As you go, Measure carefully from the track to the floor, all around the pool, to be sure that the pool depth will match the ordered liner wall height, consistently around the pool. Wrinkles or uneven stretching will result if the floor height (or depth) is not equal all around the edges and across the floor.
Prep Work Pitfalls to Avoid:
- Be cautious working around an empty pool. Falling into empty pools can be hazardous!
- Be Prepared for the Prep Work, so you can finish wall and floor prep as fast as possible.
- Once the floor is ready – install the liner quickly before debris blows into the empty pool.
- Darker swirl patterns will hide wall and floor imperfections more than light blue liners.
Step 3: Install new liner
Give the floor of the pool one last inspection for anything that might have blown in the pool. Clean off the pool deck if needed, to keep the pool clean. Remove the main drain faceplate, and replace the gasket, taping it in place so the holes line up, and so it won't shift while under the liner. Be careful to keep sand out of the main drain ring and cover screw holes.
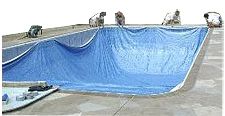
Wall is prepped, floor is prepped, and we can now open the new pool liner box and follow the included instructions. Look for the tags that indicate deep end or shallow end, and orient the liner as you prepare to pull it carefully across the pool.
With at least 3 people, one to hold the shallow end wall, two others will grab opposite sides of the liner and pull it across the pool to the deep end wall. Bend down and lock the corners into the tracks. Pennies or Popsicle sticks can be useful as a shim to hold the liner in place as you move it around to line it up to the pool corners.
Once the corners or other markers are established, and the liner appears to be hanging correctly, proceed around the pool, away from each other and lock the liner into the track. Pull any slack along the wall with you, as you go, keeping a slight tension. It is not uncommon to need to shift the liner a few inches, if it ends up slightly out of alignment. Take your time and go slowly through these next few steps.
 Pull Up the Slack: Lay down on the pool deck next to the pool step section, and lean way over the edge to grab the vinyl on the floor. Your helper can do the same on the opposite side of the steps. The purpose is to grab the liner off of the shallow end floor, and pull it towards the shallow end wall, to take up the natural slack that the liner will have towards the deep end. You can place sandbags or Water Bags up against the shallow end wall or under the step section, if it seems that you need it to help prevent the liner from slipping toward the deep end.
 Lock in the Bead: Two people work in opposite directions, locking the liner bead into the track. Start in the shallow end center, and pull opposite each other, to remove small amounts of slack, while keeping the corners in place. If you have a step section in the shallow end, you can use some duct tape for now, to help hold the liner over the span of the steps. Continue all the way around the pool, locking the liner snugly into the track. Do this from outside the pool, leaning over the edge. If the liner fit is either too tight or too loose in the track, you can use strips of Liner Lock, a rubber wedge that you push-in between the liner and the track.
How's it Hanging? After it's all in place, take a look to check the "hang" of the liner. The corners should all be central to the actual corners, although they will be very slack. The wall material should hang straight down, and although loose and wrinkly, any folds should be running vertically. If they run diagonally, you may need to shift the liner in the track somewhat. The vinyl covering the floor should also lay flat, and lift off the floor at the sides, where it meets the wall. Floor wrinkles can be pulled out by leaning over the pool edge and pulling on the liner, or using a push broom or pool brush to push them towards the wall.
If you have a step section, lay a 2×4 across the front of the steps and duct tape the liner to it, at the same height at the track. Small sandbags or water bags laid under the bottom step, on the liner, is helpful to simulate the weight of the water. When the liner is positioned properly, install the 3 strips around the front of the steps, bottom and both sides. Tighten down the screws very tightly against the rubber gasket. After all screws are tight, cut out the section of vinyl – and walk out of the pool!
Liner Installation Pitfalls to Avoid:
- No smoking around the new liner!
- No sharp instruments, No shoes.
- Install during 65-85° F. If cold, keep the liner inside a warm house until ready.
- Don't install any faceplates until the pool is full of water (except main drain).
- Plan your installation, to order all gaskets and faceplates ahead of time.
SET THE LINER
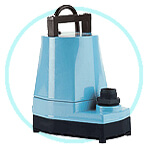
Next step is to hook up your Cyclone Blower Vac to set the liner. These vac/blowers can also be used to blow out your plumbing lines for winterizing your own pool. You can also use a large, heavy duty shop-vac of at least 5 hp to set the liner.
 What I mean by "Set the Liner" is this; we place a hose (or flat manifold shown here with the Cyclone blower) behind the liner, in between the pool and the liner and suck out all of the air with a vacuum. This pulls the liner tight against the pool wall.
Set up the vac on the edge of the pool, in the middle of a long side. Run an extension cord to a nearby outlet. Connect a 4-6′ hose to the suction port of the blower/vac, and run the hose behind the liner, by pulling a small section of liner bead out of the track. Push it down behind the liner a few feet, about a foot above the floor.
Use duct tape to seal up where the hose goes behind the liner, and to seal up the skimmer lid or a pool light cord. If all air leaks are sealed, in under a minute the Cyclone will pull the liner tight against the walls and floor. Make sure all valves on the filter system are closed to prevent sucking air through the pipes.
If you have a main drain, you will need to install the faceplate ring and the lid at this point, after the liner is set. Carefully walk down to the deep end, using boards if you have a sand bottom. Locate the screw holes under the liner, and install the ring and new gasket. Screw down very tightly with a #3 Phillips screwdriver. Then install the main drain cover securely.

If there are wrinkles in the liner, turn the vac off and work the vinyl, trying to pull the wrinkles toward one wall or the other. Banging the lower wall with a push broom, or gently persuading wrinkles with the the wood edge of a push broom works well. Turn the vac back on and you should have most wrinkles removed. Small wrinkles up against the wall should flatten out as water fills the pool.
Step Sections: There are several ways to seal up the step. In some cases you can just use a lot of duct tape, but for larger steps, you'll need to lay something flat across the top of the steps, and duct tape that to the deck and to the liner, to be able to achieve a full seal. A large flat sign, or cardboard sheet can be used. Some people cut a large section from the old liner and lay that across the steps, taping or weighting it down. Lumber can also be used, such as several 1×12″ boards laid across the top. You may ask "why not just put on the step tracks and screws?" That is done later, after the liner has stretched into place. Don't make any holes for the step section, until the water level is up to the bottom step.
When you seal up all of the air leaks, you will see the liner magically suck itself tight in just a few minutes. And now you can really see how the liner fits, how it meets the corners – and if there are any wrinkles.
Wrinkles: Don't freak out if you see a few wrinkles, it's normal. Most pools have a few at first, it just takes some finesse to work them out, by pushing and pulling them towards the wall, or expanding them across the floor. Try to do the work from up above if you have a sand floor, or use two 2'x3′ boards to gently move around the floor. Even with vermiculite or concrete floors, try not to enter the pool, and if you must, walk very gently.
 To work out wrinkles in a liner, you can use your hands to "massage" or spread out the wrinkle. Try laying on the deck and leaning way over the edge, grabbing a handful of vinyl (you may have to shut off the vacuum temporarily), and pulling towards the wall, and releasing the liner slowly into place. You could also use a push broom or pool brush on a pole, to gently push the vinyl in directions away from the angle of the fold, or wrinkle. Sand bags or water bags can also be used to hold wrinkles back until the pool fills.
In some cases, you may need to unset and reset the pool liner several times before you get it set without wrinkles. In some cases, you have to move on, and work on them later, as the last few wrinkles may be more easily worked out when there is a few inches of water covering the area.
Pool Liner Setting Pitfalls to Avoid:
-
 If the liner does not suck tight in 5 minutes, find the air leak and try again.
 - Large pools, or L-shapes may need two vacuums running before the liner will set fully.
- Some wet/dry vacs aren't strong enough for the job.
- Use 20 amp circuits (Kitchen/Garage), with HD ext. cord, to not trip the breaker.
- Vacuum must run non-stop until pool is half-full of water, or 3″-6″ deep in shallow end.
4: Fill pool
 At this point, there are usually high-fives and maybe the sound of beer cans opening. The vac must stay running until the water level is about 6″ above the floor, or just beginning to cover the hose. Continue to fill as you remove the vacuum hose and duct tape and pop this area into the liner bead track. Most average size pools will fill from the hose(s) in 36-72 hours.
With just a few inches of water in the hopper bottom, carefully walk down to the deep end and put on the main drain faceplate ring, top gasket and main drain cover. There is already one gasket under the liner, now place a second drain gasket on top of the liner and then screw on the main drain ring, or faceplate. Be sure to tighten down the screws very tight, until you hear the plastic begin to creak. Then, use a razor knife to cut out the vinyl circle inside of the ring, and then install your main drain cover, with two stainless steel screws.
 If your fill water has less than perfect water chemistry, or contains high levels of minerals and metals, such as common in well-water, consider using a pre-filter on your garden hose. The Pleatco Pre-filter removes particles below 1 micron in size, capturing metals, minerals, dissolved solids and byproducts of water treatment processes.
Keep the vacuum running until the shallow end is covered in 3-6″ of water! If you shut it off, the liner will relax, and you may end up with wrinkles.
From a Garden Hose: Measure your flow by timing how long it takes to fill up a 5 gallon bucket, then you can figure your flow rate, in gallons per minute. A little more math, and you can figure out how long it will take to fill the pool from a hose. Most hoses can do close to 10 gpm, 600 gallons per hour, or 14,400 gallons per 24 hrs. Some are only 5 gpm, however.
From a Well: If you have a decent well, with decent water, you can fill your pool with it. I have heard so many people say "Don't want run my well dry, or burn out my pump" – but that is really rare. Most wells can handle filling a pool of 20-30,000 gallons. But, monitor the outflow, and if the flow rate drops considerably, allow the well to catch up, or call in some delivered pool water.
From a Truck: Expensive to do, it can cost over $1000 in some areas to fill a pool. In our area, they charge about $250 for the first 5000 gallons, and then $200 for each additional – and they just fill their trucks from fire hydrants!
From a Hydrant: In some small towns, if you have a fire hydrant close to your house, you can contact your fire department for a permit to use the fire hydrant to fill your pool. There may be a fee, and you may need to provide your own hose, from the hydrant to your pool, but it may be an option for some people.
Wrinkles: Monitor the pool for wrinkles as it fills, or check the small ones that you saw earlier, to be sure they are stretched out. Some wrinkles just naturally flatten when a few inches of water is on top of them, and the weight of a few inches of water can be helpful in smoothing out wrinkles in the floor, by pushing them toward the wall, or spreading them out. If there is too much water on top of a wrinkle, say more than a foot, it can be harder to pull them out. If you have a sand bottom, you can sometimes push wrinkles in, to the floor, if they are very small folds.
Pool Filling Pitfalls to Avoid:
- No tripped breakers! Plug into a strong 20 amp outlet, keep the vac plug dry if raining.
- Wait to install step, light, skimmer and return faceplates until water level is up to them.
- Don't fill over your vac hose, it can be hard to remove when under water.
- Corded electric drills can be hazardous around pool water (cordless is ok).
- Install the main drain gasket, ring and cover when 3-6″ has filled the deep end.
5: Cut-in steps, returns and skimmers
 We don't install these until the pool is full, because the liner is still stretching into place. When the pool is full, install the faceplates and gaskets very tightly – with a proper size screwdriver. To prevent any leaks make sure the gaskets are solid and the screws are tight. When the plate is re-installed, cut out the vinyl inside the faceplate and flood the lines with water.
If you have a pool light, now is the time to install the ring and new gasket, and reinstall the light fixture into the niche. Reconnect the cord to the string securely, and pull the cord back through the conduit to the J-box. You may be able to reach it from above, hanging upside down, or standing in the deep end reaching up. If you need to stand on something, make sure it's soft, or placed on a broad, flat surface, so that you don't damage the new liner.
Steps & Seats
When the water level reaches the point where it's almost reached the first step, or bottom step, it's time to screw on the step strips, the 3 long plates and about 50 screws, that gaskets the liner around the steps. If the liner looks loose or is wrinkled, pull up on it, or push out on it. If necessary, use small sand bags to help hold the liner up against the wall, under the step.
Gaskets: Most step sections have a heavy duty rubber step gasket that holds up to many liner changes. If you noticed rust around the step strips, inspect the gasket and replace the heavy rubber gasket if necessary.
To install the step strips, start with the bottom strip, and with a cordless drill, screw all of the bottom strip screws in place, starting in the center and working your way to the outside. Then you can install the side strips, working from the bottom towards the top. Once all 3 step strips are screwed on, go over each one again to make sure they are double-tight. Then, trim out the vinyl carefully and close to the edge of the step strip. Install the screw hider strips and you're done!
Steps and Seats Pitfalls to Avoid
- Without water in the pool, be gentle on the step section, it could crack.
- Clean the step gasket, or use the step gasket kit if it looks damaged.
- Don't use an electric drill, if you drop it in the pool, you could die!
- Don't pull up on the liner as you make your initial screw holes, leave a little slack.
- Wait until the water is up to the screw holes before screwing in the bottom step strip.
Face Plates
 The face plates for your skimmer and return should be replaced if they have some age to them. Returns have a permanent rubber gasket, like a step section, but also use a gasket on top of the liner. Buy your skimmer gaskets and main drain gaskets in pairs, once goes under the liner, and one gasket on top of the liner.
Screw on your faceplate screws very tightly, with the large Phillips (#3) head. Crank them down until you hear the plastic squeak and creak. Now you can cut out the vinyl inside the faceplate, trimming it close to the edge with a razor knife.
Pool lights also have a large light gasket beneath the ring, and usually a second gasket beneath the vinyl. It would be wise to replace these gaskets when you replace your liner. Vinyl pool light niche gaskets are found in the category of light niche parts. When the water level is up to the bottom of the light, have someone with long arms lean way over the edge of the pool and screw on the large light niche ring and gasket. Then cut out the vinyl inside the ring. Float the pool light across the pool, and hook/duct tape your string/wire to the pool light cord. At the pool light junction box, pull up on the string/wire to pull the pool light cord back into the conduit, and into the j-box, where the power can be reconnected and turned on again. Leave 3-4 feet of cord coiled up inside the light niche, to be able to pull the light out for future repair.
Faceplate Pitfalls to Avoid
- Make sure your replacement gaskets and faceplates are exact match before liner day.
- You need all of the screws – if missing one, find a factory replacement fast.
- Don't use incorrect screws, or non-stainless steel screws. Only Skimmer Screws.
- Don't use an electric drill, use a #3 Phillips screwdriver, or #3 tip on a cordless drill.
- Leave enough cord behind the pool light to pull it up on deck for service.
- Don't poke any screw holes until the water level is up to the bottom of the faceplate.
- Don't cut out the vinyl inside until the faceplate or ring is installed.
 Now you can start the filter system, balance the water chemistry and enjoy your new inground pool liner. Installing an inground vinyl liner is not too difficult, especially if you've measured correctly.
Whew! That was a long post! I hope I've answered all of your questions about how to install an inground pool liner, if you have other questions, give our liner experts a call at 800-288-7946, or Leave a Reply below for a personal answer!

Davy Merino
InTheSwim Editor
 (1 votes, average: 5.00 out of 5)
![]() Loading...
Loading...
How to Install an Inground Pool Liner Yourself
Source: https://blog.intheswim.com/5-step-inground-pool-vinyl-liner-installation/